I get the error message:
A specified logon session does not exist. It may already have been terminated. That’s funny. I don’t recall ever being asked to log in. I suspect that this issue is due to the Microsoft account I used to log in. It must be trying to authenticate using those credentials, rather than the user I created for my Samba share. If it would just prompt me to enter my credentials, all would be right in the world. But I don’t even get that option. Luckily, there’s a fix. Hit the Win key and type “User” to bring up the User Accounts option. Click it.
Select your user account and click Manage your credentials.
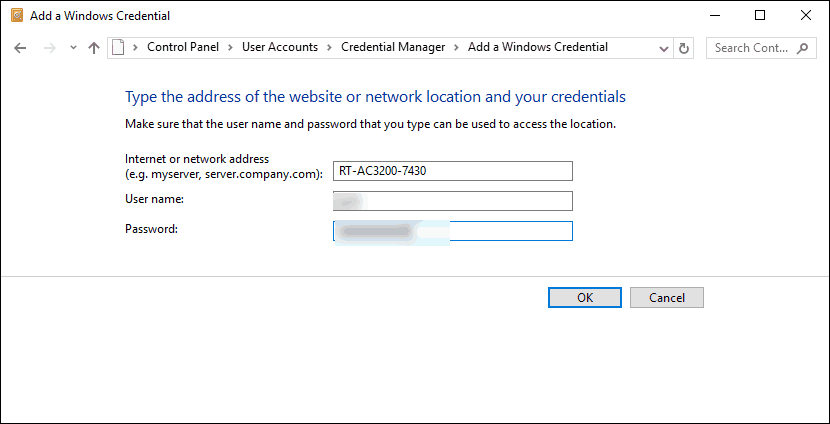
Select Windows Credentials. Look for your server name under Windows Credentials. If you don’t see it, click Add a Windows credential
Enter your login and password you created for accessing your Samba share. Click OK.
You should now see the server name under Windows Credentials. You can edit or remove them by expanding it with the arrow.
Now, when you got Network in File Explorer, you should be able to click through to your share.
If you want to map the network drive, right-click a shared folder and select Map network drive…
Since you already plugged in the proper credentials, you can stick with the default settings. Choose a drive letter, click Finish, and you’re done.
Problem solved!
Did this quick tip help you? Or are you still having trouble? Let me know in the comments or shoot me an email and I’ll try to help. -Steve groovyPost I wonder if Microsoft is getting more stupid by adding an inverse sense of security by blocking access to a Samba drive that Android devices can access without an issue, or password, OR maybe its not Microsoft, its just the people who work there have become total idiots. Did you get it working with your setup? Issue: – Unable to browse to volume in DNS-323 NAS using Windows 10 File Explorer or other applications – Issue occurred after Telus Router Upgrade Nov 2016 – The issue occurred on all PC/Laptops running Windows 10 in my network on multiple user accounts. – The DNS-323 NAS SERVER-NAME still appears in FE but the user can no longer browse to the existing volume(s) – The NAS web administration console is still accessible using a web browser and using the “SERVER-NAME” which correctly resolves to the NAS IP address. (Or you can use the IP address.) – iTunes no longer correctly resolves the NAS name for music file locations. – I’m using “WORKGROUPS” as the mechanism to share network resources. – I am using a Microsoft “cloud” account for authentication (because I’m using Office 365 and OneDrive) The error message is: ========================================================================== \” SERVER-NAME ” is not accessible. You might not have permission to use this network resource. Contact the administrator of this server to find out if you have access permissions. A specified logon session does not exist. It may already have been terminated. ============================================================================ Research and diagnostics. – I moved a laptop where the issue occurred to another network with an identical NAS DNS-323 and SERVER-NAME, but using a d-link router that had been in service for several months. The issue did not occur which leads me to believe the issue was introduced with the router change, but the router is not necessarily the root cause of the problem. – The DNS-323 is an older generation that uses SMB-1 protocol – Based on my Google searches, Windows 10 (anniversary edition patched to Nov. 2016) has had a number of documented issues with SMB and NAS devices – Numerous re-boots, resets of NAS, Router, PC in various orders. – Firmware checked on Router, NAS (no ongoing support) Work arounds – 2 so far
- – Change from a Microsoft “cloud” account to a local account. a. Go to Settings-> Accounts -> Sign in with a local account instead b. You will need to do this with each account in your network on each PC/Laptop This fixes the authentication problem but disables all the functionality gained from using a cloud account such as synchronization of user settings.
- – Add credentials for the NAS into the Windows Credential Manager: a. Go to Control Panel -> User Accounts -> Manage Your Credentials -> Windows Credentials b. For each server you wish to access, add in an entry for “SERVER-NAME ” and a username of “user” and password of “user” or other random string (anything appears to work). c. You will need to do this with each account in your network on each PC/Laptop This fixes the authentication problem but you need to remember to do this if you add a new account. This is my preferred work around. Thank you Jack ! Next Steps – Check to see if this is fixed with next Windows 10 update – As per work around 1 the issue appears to be associate with Microsoft “cloud” authentication so what string is it passing to the NAS and is the NAS rejecting authentication or is Windows deciding authentication is not possible? How does SMB play in this? – I suspect that there is something left in the registry that references the previous router/NAS that may interfere with authentication after replacing the router so will scan registry manually looking for clues. – It may be time to upgrade to a new NAS with SMB 2/3 protocol Thanks Gregory Hickmott MSCE -Steve gPost Comment Name * Email *
Δ Save my name and email and send me emails as new comments are made to this post.
![]()


