Hello again to all Photoshoppers reading this tutorial! For today’s tutorial, we’ll take a look at a few things you can do to hair in any photo or image. Hair edits are pretty simple, but require a lot of patience unlike other basic touch ups. So arm yourself with confidence and patience and let’s go!
You Will Need:
Photoshop CS3/CS4/CS5/CS6/CCA photo of someone who isn’t bald… :DSome free timePatience
Select an Image
For this tutorial I will be using the following image. It’s a great example and the hair is relatively easy to select:
Step 1 – Make Your Selection in Photoshop
You can select the image using any selection method you like. I used a combination of the Freehand Lasso Tool and Quick Mask Mode. Here is the result I came up with:
Step 2 – Changing the hair color
There’s a couple of ways to go about this. The first method is to add a Hue/Saturation Adjustment Layer to the image. You can do this by pressing on the Hue/Saturation button from the Adjustments panel.
A new Adjustment Layer + Layer Mask will be created. From here, you can play with the sliders until you get the desired result. Pro Tip – Turn on Colorization for an easier and more effective color adjustment.
Method 2 – Overlay Layer with a Layer Mask
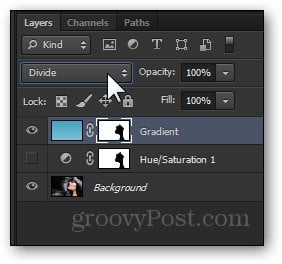
You can save your changes for the first method and continue on to try the second one without deleting anything. First, create a new layer from the New Layer icon at the bottom of the layers panel. I’ll name mine “Gradient”, since that’s exactly what I will be using as an overlay.
Now, while holding the Alt key, I will click and drag the Layer Mask from the bottom Hue/Saturation layer over to the new one. This creates the same layer mask over to our new layer.
Now I will select the Gradient Tool and use its Gradient Creator. That way I can create my own gradient based on the effect I want to achieve.
From here, I will drag out a quick Gradient from top to bottom. Afterwards, I will select a different Blending Mode. I’ll try Divide for this situation.
And here is my final result:
Done!
As an added bonus, and to save you the hassle of scrolling up and down, here’s a quick before and after:
If anyone else on the team does GIMP I’ll make sure to ask him to throw in a few articles for you :) I think you can do the same with GIMP by selecting the area and using color balance or hue-saturation. Comment Name * Email *
Δ Save my name and email and send me emails as new comments are made to this post.


