These include conditional formatting and color categories to add different fonts and colors to your emails. Here’s how to use these features in Outlook.
Using Conditional Formatting in Outlook
Conditional formatting allows you to set formatting rules for Outlook emails. You can set different colors, fonts, and styles to your email messages as they appear in your inbox. To get started, you’ll need to create a new conditional formatting rule. In Outlook, click View > View Settings in the Current View category. In the Advanced View Settings window, click Conditional Formatting.
Creating a New Conditional Formatting Rule
Outlook already uses conditional formatting rules for specific scenarios, as you’ll see from the Conditional Formatting settings window. Unread emails, for instance, will appear with blue text using the Segoe UI font. To add your own conditional formatting rule, click the Add button.
Give an appropriate name to your rule, then click Font to set your formatting options like font, color, and size. Click OK to confirm your font settings.
Once the formatting style for your rule is set, click the Condition button.
From here, you can set the rule to apply automatically to emails that contain certain keywords or to emails sent to or from, certain email addresses.
Formatting by Email Address
To add a rule that applies to emails from a specific sender, type the email address in the From box, separating multiple email addresses with a semi-colon. You can apply this to all emails sent from a single site by typing @domain.com, replacing domain.com with the correct domain name. You can also do this for emails you send, rather than receive, by typing the email address in the Send To box instead.
Formatting by Keyword Search
To apply your conditional formatting rule to emails that contain words, type the keyword (or keywords) in the Search for the words box. Select the Subject field only option in the drop-down menu below to only search the subject field for your chosen keywords, or the Subject field and message body option to search the entire email.
Advanced Conditional Formatting Rules
You can create further complex formatting rules in the More Choices and Advanced tabs. From here, you can apply your new rule to emails by their read status, importance, follow-up flag, size, and more. For instance, to set your rule to apply only to unread emails, click the Only items that are checkbox in the More Choices tab, then select the Unread option from the drop-down menu.
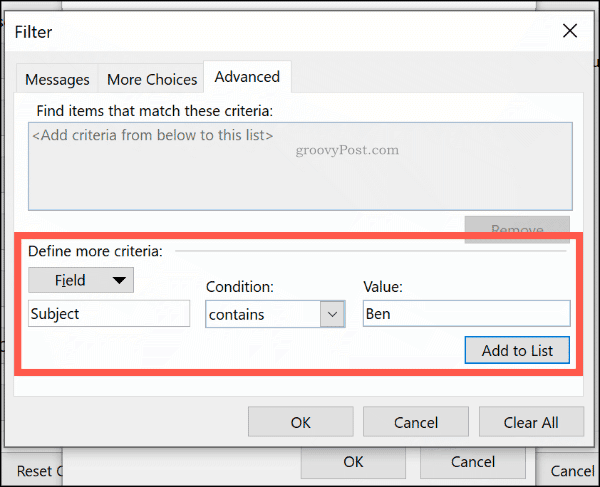
In the Advanced tab, you can create specific searches for your rule using almost all available Outlook data. Clicking the Fields option gives you hundreds of options to choose from. The most common fields are listed under the Frequently-used fields category. Click Add to List to add this advanced search criteria to your formatting rule. The example below shows an advanced search for all emails that contain “Ben” in the Subject field.
Once you’re happy with your rule, click OK to confirm, then OK to close the Conditional Formatting settings window.
Using Email Categories
While it’s possible to categorize Outlook emails using search folders, another way of emphasizing your important emails is to apply a category. Categories have a separate name and color tag, allowing you to view them separately. A green-yellow-red color system could help you prioritize the most important emails, for instance. By default, Outlook offers categories in blue, green, orange, purple, red, and yellow. You can edit these or create your own, using alternative colors and names.
Creating or Editing Categories
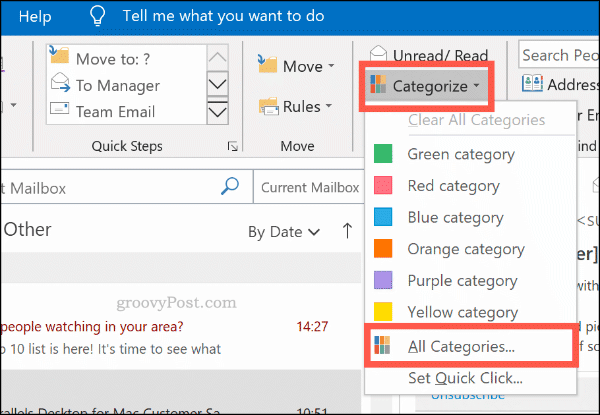
To create a new category, or to edit an existing one, click Home > Categorize > All Categories.
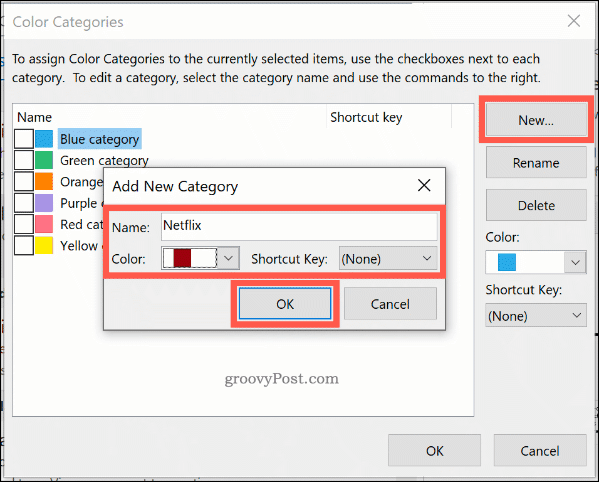
Click New to create a new category. Select your category color from the drop-down menu, giving it a name in the Name box above.
Click OK to save your category.
Manually Applying a Category to Outlook Emails
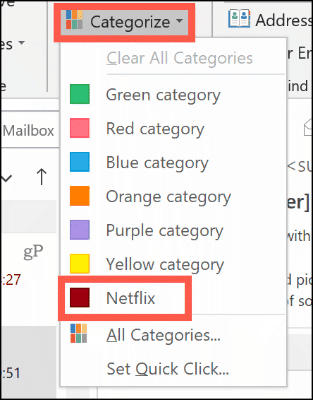
To manually apply a category to an Outlook email, select it in the Outlook folder view. Click Home > Categorize, then click on your category.
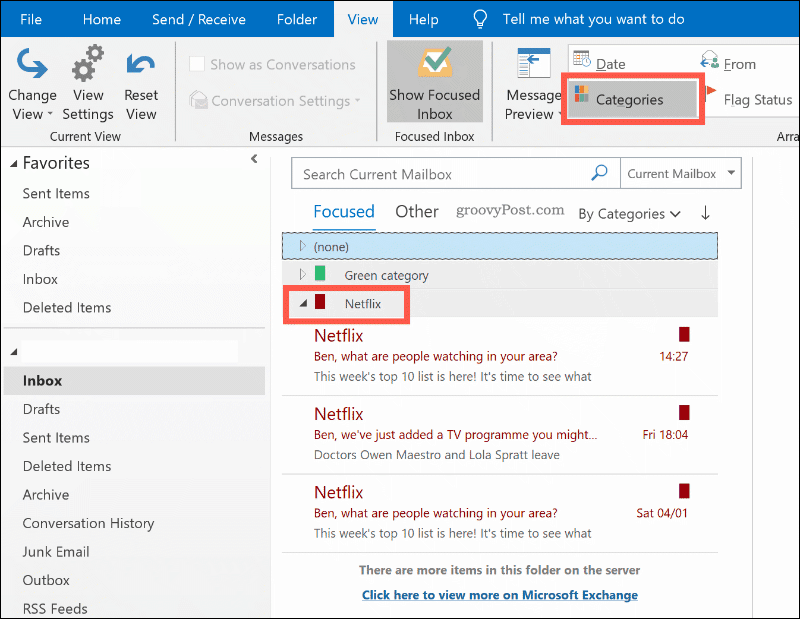
Your category will appear as a colored square in the default Outlook folder view, above the receipt time and date. The name of your category will appear below the email subject in the email view. To view emails by category, click View > Categories and scroll to the appropriate section for your category.
Automatically Applying Outlook Categories
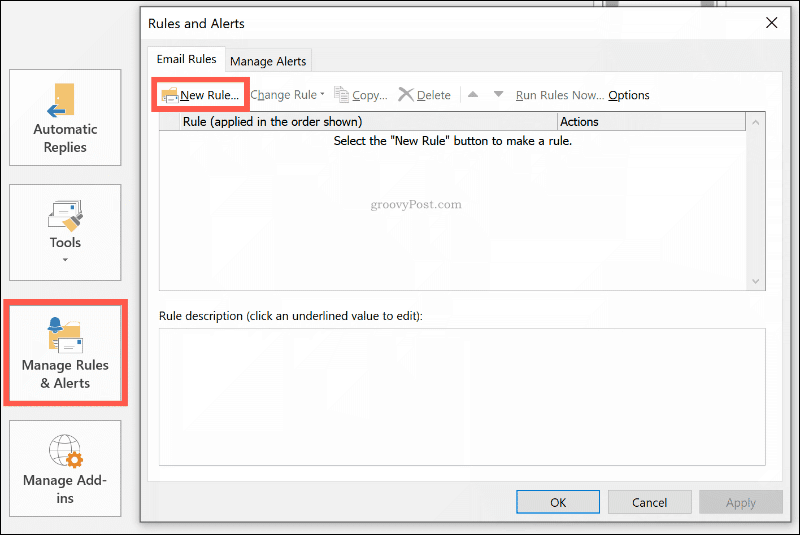
You can also use Outlook rules to apply categories to certain emails automatically. To do that, click File > Info > Manage Rules & Alerts. In the Email Rules tab of the Rules and Alerts menu, click the New Rule button.
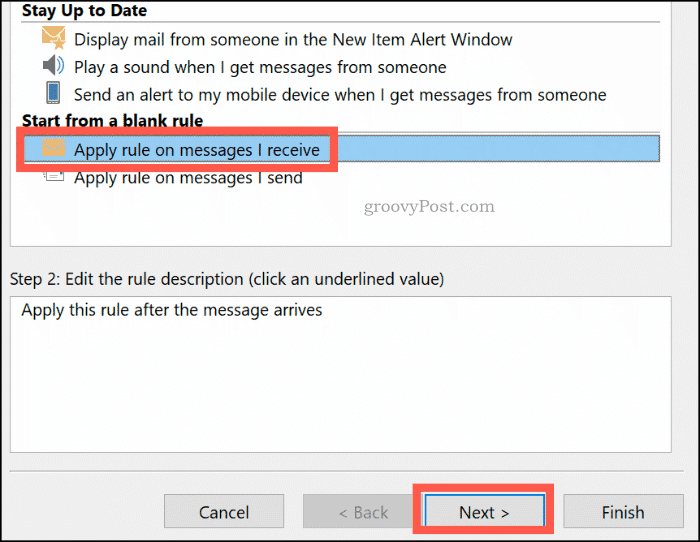
Select Apply rule on messages I receive before clicking Next.
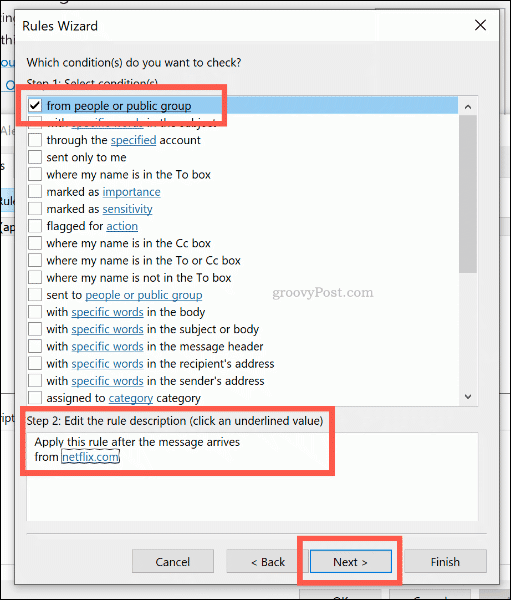
Select the search criteria for your color category rule. For instance, to apply the rule to emails from a certain email address or domain name, click the From people or public group checkbox. In the Step 2 area below, click on the criteria again (underlined in blue). Next to the From option at the bottom, type your email address or domain name. If Outlook can find the email address in your existing mailbox, select it from the list that appears, then click OK. If it can’t, click Cancel. The rule will be created regardless. Click Next to continue.
You can set the action for your rule at the next stage. Click to enable the “Assign to the category category” option in the Step 1 section. Select the category to assign to this rule by clicking a category in the Step 2 section below, before clicking OK, then Next.
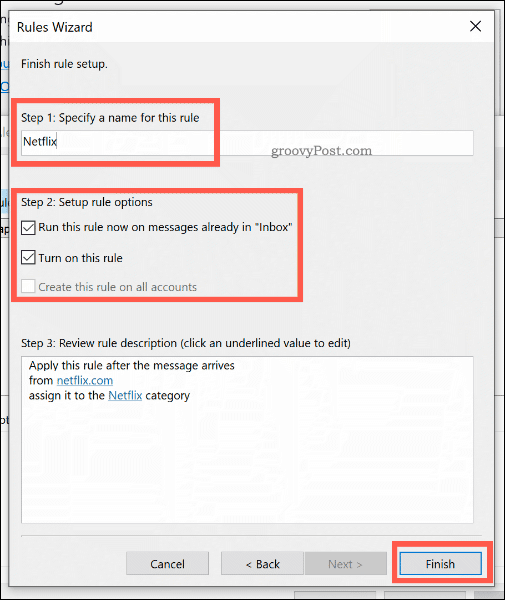
The next stage allows you to select any exceptions to this rule. Select these, as above, or click Next to continue. At the final stage, give a name for your color category rule, then select the Run this rule now on messages already in “Inbox” checkbox to retrospectively apply it to all of your existing emails.
Click Finish to create and run the rule. The color category will be applied to your emails, as per the criteria you selected.
Don’t Miss Your Important Outlook Emails
Using color categories and conditional formatting rules is a great way to make the important emails you send and receive stand out in Outlook. Don’t forget to boost your Outlook productivity even further by using additional Outlook rules and follow-up flags to keep track of email chains and important tasks. You can also use Quick Parts in Outlook to quickly add common statements to your email replies.
![]()


